Translate News or Update in your language
Most final-year students (third-year students especially) in Mumbai University and other universities in India are required to submit 1-3 copies of a BlackBook of your project report back to your college/institute. Here’s the way to write an excellent Blackbook for your final year project. Also find examples, templates, formats, and PDFs for Blackbook projects on various topics and for various disciplines (BMS, BBA, BMM, BFM, BCom, MBA, Engineering, and more.).
Some universities ask students to submit the Project Synopsis before submitting the ultimate project. A project synopsis provides a summary of the whole project, like its aims, objectives, and other important details.
Download Onion Ride BlackBook Sample
To download sample
1) Go to onionride.com and search for "Blackbook Sample"
2) Select the File icon, which is below the search box
3) New Select Extension Option will be visible, Select "Tex" extension
4) At the top you will see Onion Ride Blackbook Sample Download, click on it to download the sample Blackbook file.
How to Edit Downloaded Blackbook Latex File
Here I will show you all the best ways to edit the latex file.
Steps to open Blackbook latex file
1) Go to Overleaf
2) Create your free account.
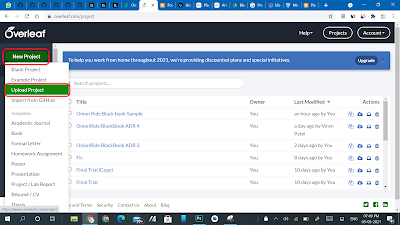
3) Click on a new project and then on upload project
4) Upload zip file downloaded from onionride.com
Step to edit Blackbook Latex file:
1) After opening Blackbook file in overleaf, you will see page as below
2) You all will see three section there,
- First there are all files which we have added in overleaf, Figuras contain all images, Onion-content contain all chapter latex file, below that there is on PDF file of published paper which we have to include at the last, below that it has main.tex file which is our main latex file which include all chapter and images.
- Source Editor
- After compile we will see our pdf there
3) All pages and chapter was included in main.tex file by :- \include{Onion-content/home}
you can remove pages based on your choice.
4) At starting to edit Certificate page go to Home.tex file in Onion-content, do changes based on your requirement.
5) Here are some file name based on they used so that you can edit it
- Certificate - Home.tex
- Project approval for BE - projectapp.tex
- Declaration - declaration.tex
- Acknowledgment - acknowle.tex
- Abstract - abstract.tex
6) Here are some Chapter files name which we have used
- Introduction - C1introduccion.tex
- Literature Survey - C2litreture.tex
- Methodology - C3methods.tex
- Conclusion - C4conclusiones.tex
- Reference - reference.tex
7) To add new chapter or page you can create new file in Onion-content and add it using \include{Onion-content/newfile}
8) To insert image add images to figuras folder by selecting folder and then click on upload to upload images.
9) After upload insert image by following code
\begin{figure}[H]
\centering
\includegraphics[width=12cm]{figuras/image-file-name.png}
\caption{Search Engine Block Diagram}
\end{figure}
10) Replace image-file-name with your image file name.
11) To start content from new page insert
\newpage
and write anything below it to start from new page.
12) Now you can edit all files based on your content in all above tex file.
13) We have added table of content and list of figure, if you want to add list of table you can add it as we have commented it in main.tex - go to line 136 there you can see %\listoftables just replace it by \listoftables or remove % from starting to display list of table.
14) To publish your paper, write proper paper or check plagiritm or to publish it in journal you can check our other post and come back here again.
15) To add publication at last in blackbook, go to main.tex file find
\includepdf[page=-]{ISU2005.pdf}
which must be at the last line of the file
16) Replace it with
\includepdf[page=-,offset=-1.35cm -0cm]{ISU2005.pdf}
After doing this only you can see your attached pdf publication properly, now follow one last step to add your publication at the end of blackbook.
17) Finally we have created our blackbook now lets add publication pdf file. Go to 168 line in main.tex file there change name of your publication and upload your publication pdf file and then goto line number 174 and change ISU2005.pdf with your pdf file name.
View Sample Black Book
Conclusion
We have finally created our black book with latex.
If you have any doubts in editing file or any other bugs in file you can contact me on whatsapp :- +918408993879


